POS Setup & Implementation
We are excited to start working with you on the Wine Preserve (BID)!
We know you have more questions. We have compiled as many of them in this section.
If you still have questions after reading this section, please feel free to reach out to us.
POS SYSTEM SETUP & CONFIGURATION
Ensure your Point of Sale (POS) system is set up if you are passing the fee onto the consumer. Some systems may be able to do this automatically, some may need to be manually added.
Label the Fee Clearly – name the line item:
- “Santa Cruz Mountains Wine Heritage District”
- “SCMWine Heritage District”
- “SCMWHD” (if character limits apply)
Fee Collection – Configure your POS system to automatically apply the 1% fee on all taxable gross retail sales, or configure it manually.
Test Before Going Live – Run test transactions to confirm the fee is applied correctly and appears on receipts, or in the cart.
Setting up these Fees/Taxes within Commerce7
Here’s how to set it up:
- Go to Settings > Taxes.

- Click on the Custom Taxes tab.
- Click on the Add Custom Tax button.
- Fill in the fields with the below settings and Save.
- Title: Tax Region (for this example, we are using ‘Temecula’)
- Tax Type: Percentage
- Country & State: United States & California
- Zip Code: Enter in applicable zip codes separated by commas. (If no zip codes are defined, the tax will apply to the entire state).
- Wine: ‘1’ (or whichever percentage is correct)
How It Works
For the above example, a fee of 1% will automatically be added to California orders.

Deleting/Disabling the Fee
If you do not want to collect the fee any longer, here’s how you can disable it.
- Go to Settings > Taxes.
- Click on the Custom Taxes tab.
- Click into the Temecula section (or any other fee that you’ve set up).

- Click More Actions and choose Delete.
FAQs
- Are these fees passed to ShipCompliant and Avalara?
Yes, these fees are included in the order transmitted to ShipCompliant and Avalara, but they are not itemized separately (from other sales tax) within their respective reports. - Where are these fees reported within Commerce7?
- Store > Orders > Export Orders: any Custom Tax has its own column in the Order export.

- Reports > Finance Reports > Tax report: any Custom Tax will be reflected in this report.

- Store > Orders > Export Orders: any Custom Tax has its own column in the Order export.
- Is sales tax assessed on this fee?
No. Sales tax is not assessed on the fee. However, the Santa Cruz Vintners suggest a workaround of setting the % values to 1% + your local tax (to the nearest 100th, for example 1.08) if you would like to collect tax on top of the fee. - Is it possible to set up a tax that is county-specific?
Yes. You can set up fees per zip code. Learn how here.
To apply a 1% fee to all retail sales in California using the Nexternal POS system, where the assessment is also subject to sales tax, follow these steps:
1. Access the Nexternal Order Management System (OMS):
- Log in to your Nexternal OMS with your administrator credentials.nexternal.com
2. Navigate to the ‘Settings’ Section:
- From the main dashboard, click on ‘Settings’ to access system configurations.
3. Locate the ‘Order Processing’ Settings:
- Within ‘Settings,’ find and select ‘Order Processing’ to manage order-related configurations.nexternal.com
4. Set Up a ‘Surcharge’ for the Fee:
- In the ‘Order Processing’ section, look for ‘Surcharges’ or a similar option. nexternal.com
- Click ‘Add New Surcharge’ to create a new surcharge.
- Name the surcharge (e.g., “SCMWHD”).
- Set the surcharge rate to 1% of the order total.
- Ensure the ‘Apply to All Orders’ option is selected to include this surcharge on all retail sales.
5. Configure the Surcharge to Be Taxable:
- Within the surcharge settings, there should be an option to mark the surcharge as taxable.
- Enable this option to ensure that the 1% fee is included in the taxable amount of the order.
6. Save and Test the Configuration:
- After configuring the surcharge, save your changes. help.extensiv.com
- Perform test transactions to verify that the 1% fee is correctly applied and that it is included in the taxable amount.
7. Consult Nexternal Support if Needed:
- If you encounter any issues or require further assistance, contact Nexternal’s customer support for guidance.
Important Considerations:
- Tax Compliance: According to the California Department of Tax and Fee Administration (CDTFA), fees or assessments related to the retail sale of tangible personal property are subject to sales tax. Therefore, it’s essential to configure the assessment as taxable to comply with state regulations.
Final Steps and Tips
- Verify on Receipts/Reports: After implementation, verify that your receipts (printed and emailed) show the line item correctly.
- Account for the Fee: The 1% collected will need to be passed on to the Santa Cruz Vintners (via the BID’s third-party collector). More details will be provided on how to remit the fees collected as soon as the contract with the County is finalized. Likely the reporting and payment to the BID’s third-party collector will be monthly in the first year, then quarterly after the first year.
Required Disclosure – If the assessment is passed on to customers, it must be disclosed in advance. The disclosure can be placed:
- On a sign or placard in the tasting room
- On tasting room menus, event flyers, and restaurant menus (if applicable)
- In the footer of your website or in the checkout/cart
- On receipts, even if the customer declines the receipt
- In wine club emails
Sample Disclosures
- If the fee is passed on: “All retail sales subject to a 1% Santa Cruz Mountains Wine Heritage District fee.”
- If the fee is included in the retail price: “All retail sales include a 1% Santa Cruz Mountains Wine Heritage District fee.”
Below are step-by-step instructions to configure Shopify POS for in-person and online sales.
Add Fee as a Product (Separate Line Item)
Create a separate fee line item that gets added to each applicable order. We achieve this by treating the 1% assessment as a product/service in Shopify. This line item will appear above the tax line and, because it’s a normal product (just one created for the fee), it will be taxed at the standard rate.
Setup the Fee Product: Manual addition during each transaction. (for Automated Fee Application, see below)
1. Create a “1% Assessment” Product: In Products > Add product, create a new product called something like “SCM Wine Heritage District” or “SCMWHD”. You may want to set the Price to $0.00 (we will adjust the price at runtime) or a nominal value, since it will vary per order.
2. Make it Taxable: Under Pricing, check “Charge taxes on this product”. This is crucial – it ensures that when this item is added to an order, Shopify will apply California sales tax to it just like any other product. (This satisfies the requirement that the 1% fee itself is taxed at the same rate as the rest of the sale.)
3. Hide from Online Store: If you don’t want customers to see or purchase this item on its own, uncheck the Online Store sales channel visibility (or mark it as a draft product). It’s just a fee placeholder, not something anyone should manually buy directly.
Applying the Fee in Shopify POS (In-Person Sales):
For each tasting room transaction involving taxable sales, your staff will need to add this “1% Assessment” line item:
Method 1: Use Custom Sale – Shopify POS allows adding a custom line item on the fly. Tap “Add custom sale”, enter the name (e.g. “1% Assessment Fee”) and the price which is 1% of the customer’s merchandise total, and mark it as taxable. For example, if the pre-tax sale subtotal is $50.00, enter $0.50. Shopify POS will list this as a separate item in the cart. Because it’s marked taxable, the POS will include this $0.50 in the taxable amount for calculating sales tax.
Method 2: Use the Fee Product – Add the product you created (“SCMWHD 1% Assessment”) to the cart. By default its price might be $0.00, but POS (if you have the “Allow price editing” option enabled for custom items or if using a discount to adjust it) could let you override the price. Alternatively, you can create the fee product with a small unit price (like $0.01) and then adjust the quantity to reach roughly 1% of the sale. For instance, for a $50 sale, adding 50 units at $0.01 gives $0.50. This is a bit cumbersome, so using the custom price entry is easier.
To streamline this in POS, consider adding the fee product or custom sale as a tile on your POS home grid. For example, you could add a tile that when tapped, adds the “1% Assessment” product to the cart. Staff would then just input the correct amount. This reduces the chance of forgetting the fee.
Applying the Fee in Online Shopify Orders (Web Sales):
Shopify’s checkout won’t automatically add this fee item without some custom solution:
• If you have Shopify Plus, you can use a Script or Shopify Function to automate adding the fee. For example, a Shopify Script (written in Ruby via the Script Editor) can calculate 1% of the cart subtotal for customers with a California shipping address and add the “1% Assessment” item with that price to the cart at checkout. This script would run after the customer enters their address (to determine if CA). Shopify Plus also allows a custom checkout, so you could label the line clearly. (Creating such a script requires developer input – but it achieves a truly automated, itemized fee on Plus.)
• If you do not have Shopify Plus, fully automating this is not possible with native features alone. A semi-manual workaround is to edit orders after they’re placed: for any order shipping to CA, you could edit the order in the admin to add the “1% Assessment” product with the appropriate price, then send the customer an invoice for the difference before fulfillment. However, this is labor-intensive and risks compliance issues if the customer doesn’t pay the additional fee. Alternatively, you might increase all your product prices by 1% and then refund that amount for non-CA customers – but this is also messy and not recommended. In short, without an app or Plus script, Shopify’s native checkout can’t easily add a dynamic fee line item for online orders.
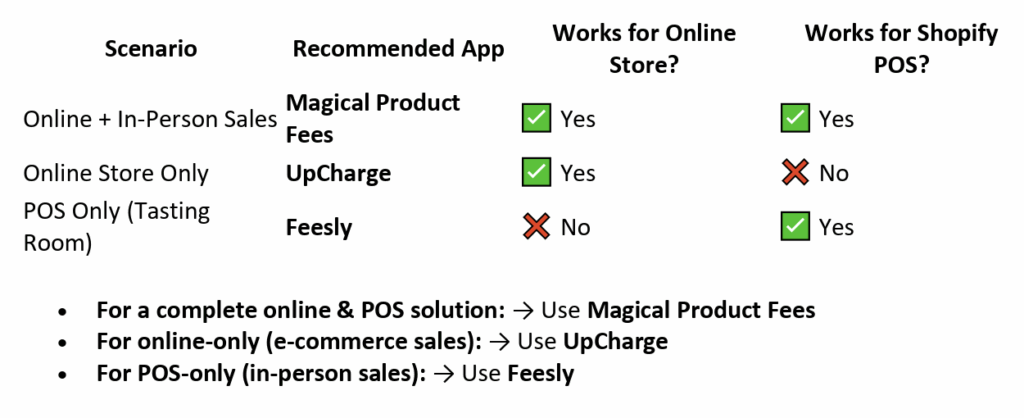
App/Plugin Solution (Automated Fee Application)
To avoid manual calculations and ensure the 1% assessment is always applied when required, you can use a Shopify app designed to add fees or surcharges. These apps inject an extra line item at checkout under certain conditions (e.g. based on location), and can be configured to be taxable. Here are recommended apps and how to set them up:
1. Magical Product Fees (Excise Tax & Surcharge App) – Best for Online + POS
- Automatically adds a taxable, separate line item for the 1% assessment at checkout.
- Works on both online store and Shopify POS for in-person sales.
- Supports conditional application (only applies when shipping to California).
- Seamless checkout integration (no need for manual adjustments).
Starter Plan: $9.99 per month features:
- Fixed price fees.
- Percentage-based fees.
- Apply fees to products.
- Apply fees to order subtotal.
- Compatible with Online Store and POS.
Growth Plan: $19.99 per month features:
- Features tailored for Shopify Plus users.
- Fixed or percentage fees to order total. o Location-based fees.
- Payment method fees.
- Trial Period: 14-day free trial.
Additional Notes: This app offers a comprehensive solution for adding required fees, surcharges, tariffs, and deposits to products or orders, with advanced customization options.
Setup Instructions for Magical Product Fees App
Step 1: Install the App
- Visit the Shopify App Store and search for “Magical Product Fees” (or click here if searching manually).
- Click “Add App” and complete the installation.
Step 2: Configure the 1% Assessment Fee
- Open Magical Product Fees from your Shopify Admin.
- Click “Create New Fee” and select Percentage Fee.
- Name the fee → Santa Cruz Wine BID 1% Assessment.
- Set the fee amount → 1% of the order subtotal (excluding shipping).
- Mark the fee as taxable (this ensures that CA sales tax applies to it).
Step 3: Apply the Fee Only to California Orders
- Under Conditions, set the rule: Applies only if the shipping address is in California.
- Enable for POS → Ensure the fee applies to both Online Store and POS (if using Shopify POS in your tasting room).
Step 4: Test Checkout & POS Transactions
- Add products to your cart and enter a California shipping address → The 1% assessment should appear as a separate line item above the tax line at checkout.
- If using Shopify POS, ring up an order and verify that the fee automatically appears when finalizing the transaction.
UpCharge: Surcharges & Fees (Alternative Option for Online Sales)
- Adds a percentage-based surcharge as a separate line item
- Can be customized to apply only to California transactions
- Works best for online store checkout (not fully integrated with POS)
Recommended for use with Bloom. Once installed, contact Bloom support to test and confirm it is working properly. https://apps.shopify.com/product-fees
- Estimated Cost: $9.99 per month
- Features:
- Unlimited product fees and surcharges.
- Location-based order fees, tariffs, and surcharges.
- Fixed and percentage-based fees.
- Product and cart conditions.
- International order tariffs and fees.
- Online chat and email support.
- Trial Period: 14-day free trial.
Setup Instructions for UpCharge
1. Install the App → Find UpCharge: Surcharges & Fees in the Shopify App Store and install it.
2. Create a New Surcharge
- Name it “SCMWHD 1%”.
- Set the fee type as 1% of subtotal.
- Enable Taxable Fee (so sales tax is applied to the fee).
3. Set the Fee to Apply Only to California
- Use UpCharge’s built-in location filter to apply the fee only when a California shipping address is entered.
4. Test Online Checkout
- Add a product to the cart, proceed to checkout with a California address, and verify the 1% assessment appears as a separate line item before tax.
Note: UpCharge is not fully compatible with Shopify POS, so if you need a solution for both online and in-person sales, Magical Product Fees is the better choice.
Feesly (Best for Shopify POS Only – In-Person Sales)
- Adds a surcharge during in-person transactions at checkout.
- Designed for Shopify POS (not online store).
- Low-cost option ($0.99/month).
https://apps.shopify.com/custom-fees?
Estimate Cost: $0.99 per month.
Features:
- Create fixed or percentage-based fees.
- Apply fees manually on your POS.
- Configure a list of fees for your POS.
- Reports on fee usage.
- Decimal fees support.
Trial Period: 30-day free trial.
Setup Instructions for Feesly on Shopify POS
1. Install Feesly – POS Fees & Surcharges from the Shopify App Store.
2. Create a New Fee labeled “SCM Wine Heritage District fee 1%”.
3. Set the fee type as 1% of subtotal and ensure it is taxable.
4. In Shopify POS, add Feesly as a Smart Grid Tile (so staff can tap it to apply the fee).
5. Test an in-person sale to confirm the fee appears above tax on receipts.
Best Use Case: If you only need an automated solution for in-person sales (tasting room transactions) and not online, Feesly is a simple and affordable option.
Required Disclosure – If the assessment is passed on to customers, it must be disclosed in advance. The disclosure can be placed:
- On a sign or placard in the tasting room
- On tasting room menus, event flyers, and restaurant menus (if applicable)
- In the footer of your website or in the checkout/cart
- On receipts, even if the customer declines the receipt
- In wine club emails
Sample Disclosures
- If the fee is passed on: “All retail sales subject to a 1% Santa Cruz Mountains Wine Heritage District fee.”
- If the fee is included in the retail price: “All retail sales include a 1% Santa Cruz Mountains Wine Heritage District fee.”
Clarify on Receipts – Ensure that receipts display the BID fee as a separate line item with clear wording if passed on to the consumer.
Wineries using OrderPort POS can add a service fee (e.g. a 1% surcharge on all retail sales) and configure taxes to comply with California regulations. Below are step-by-step instructions from official OrderPort documentation on setting up a 1% service charge for both in-person (POS) and online sales, and guidelines to ensure this fee (and other required fees like CA bottle recycling deposits) are taxed correctly. We also include references to California specific tax rules that wineries should follow.
Setting Up a 1% Service Fee in OrderPort POS
1. Create a Service Charge Product: In OrderPort’s Catalog Manager, click “New Product.” For the Product Type, select “On Demand,” then choose the subgroup “Service Charge Rate” (for a percentage-based fee). This allows you to define the service charge as a percentage of the final bill orderport.freshdesk.com. (If you do not see the Service Charge subgroup, contact OrderPort support to have it enabled orderport.freshdesk.com.)
2. Configure the Service Charge Details: Give the charge a clear name (e.g. “SCMWHD”) as it should appear on the POS and receipts. Then enter the percentage rate – in this case, 1% – as the value of the service charge, and save the new product orderport.freshdesk.com. After saving, assign this service charge item to an appropriate group/subgroup in your catalog for organization (for example, a “Service Charges” or “Fees” category), and mark its status as Active so that it becomes available in your inventory and POS orderport.freshdesk.com.
3. Verify in POS: Once active, the service fee will appear in the POS just like any other product in the group you assigned. During a checkout, after adding all regular items to the cart, you can add the Service Charge item to apply the 1% fee. The service charge will show up as a line item in the cart, and OrderPort will automatically calculate the 1% of the transaction total and include it in the final amount due orderport.freshdesk.com. In other words, the POS will list the service charge in the order summary and apply the correct additional fee (percentage or flat amount as configured) before payment is processedorderport.freshdesk.com.
Applying the Fee to All Sales (POS and Online)
Once the 1% service charge is set up as a product, it can be applied to in-person POS sales and online eCommerce orders:
• In-Person (Tasting Room POS): Your staff should add the service charge item to each applicable sale. After ringing up the customer’s items, simply tap the Service Charge product in POS before finalizing the order. The POS will then include the 1% fee automatically in the transaction total orderport.freshdesk.com. (For example, on a $100 sale, adding the service charge item will add $1, making the subtotal $101 before tax.)
• Online Sales (Webstore): Ensure the service charge product is also visible on your webstore catalog so it can be used for online orders. OrderPort treats the fee as a normal product, so by default it won’t automatically add itself to web orders – you’ll need to include it just like any other item. Many wineries accomplish this by customizing their checkout process or cart requirements. For instance, you might script the webstore to auto-add the “1% SCMWHD Fee” item to every cart, or include a notice to customers. If you need assistance, work with OrderPort support to configure an automatic addition of the fee for online orders (since there isn’t a simple built-in “autoadd” toggle for service charges on the webstore). The key is that the fee item must be present in the order for the charge to apply, whether the sale is on the POS or the website orderport.freshdesk.com.
Tip: Once configured, test a couple of transactions (in POS and on the webstore) to verify the 1% fee is correctly added to all orders. This helps ensure there are no surprises for customers and that your staff remembers to include the fee on every sale.
Ensuring the Service Fee is Taxed Properly
In California, a mandatory service charge or fee is generally subject to sales tax (similar to any other part of the selling price). To make sure your 1% fee is taxed correctly in OrderPort, do the following:
• Mark the Fee as Taxable: When creating the service charge product in Catalog Manager, there is an option to indicate if the product should be taxed. Be sure to enable taxation for this service charge item. (For example, when creating any product in OrderPort, you fill in fields like title, price, etc., and specify “if you want this product to be taxed” orderport.freshdesk.com. Make sure your service fee item is set to be taxed so that it doesn’t get treated as a non-taxable item.) Once this flag is on, OrderPort will apply the appropriate sales tax to the fee amount whenever it’s added to an order, just like it does for other taxable products.
• California Tax Rules: According to the California Department of Tax and Fee Administration (CDTFA), mandatory charges such as the California Redemption Value (CRV) deposit on beverage containers must be included in the taxable amount of a sale orderport.freshdesk.com. In their guidance, the state explicitly notes that there is “no exclusion for the CRV amount from the measure subject to sales or use tax, even though those amounts may be itemized to the customer”
orderport.freshdesk.com. By the same logic, a required service fee (like your 1% surcharge) is considered part of the sale and is taxable in CA. Ensure you follow this principle by taxing the fee. (Voluntary tips or gratuities, in contrast, are not subject to sales tax, but a required fee is taxable.)
• OrderPort Tax Configuration: OrderPort’s Sales Tax & Licenses settings give you control over what gets taxed in each state. For example, you can specify per state whether to charge tax on shipping and handling charges training.orderport.net. Make sure your settings for California are configured to include tax on service-related charges. Generally, you would charge tax on any mandatory fee in CA, while certain shipping charges might be non-taxable (more on that below). By default, OrderPort’s tax automation (or integrated tax service like Avalara AvaTax for Beverage Alcohol) will calculate CA sales tax including the service fee if the product is marked taxable and categorized correctly. It’s wise to double-check that you haven’t inadvertently turned off tax for any category that your service fee might fall under.
• Verify Tax Calculation: After adding the service fee to a test order, verify that the sales tax being charged equals the correct percentage of the new total. For instance, if your local combined sales tax rate is 8% and your customer bought $100 of wine, adding a 1% fee makes the subtotal $101; the tax should then be 8% of $101 (not just $100). OrderPort will handle this as long as the fee is set up as taxable. If you notice the fee is not being taxed, revisit the product settings or tax configuration.
Required Disclosure – If the assessment is passed on to customers, it must be disclosed in advance. The disclosure can be placed:
- On a sign or placard in the tasting room
- On tasting room menus, event flyers, and restaurant menus (if applicable)
- In the footer of your website or in the checkout/cart
- On receipts, even if the customer declines the receipt
- In wine club emails
Sample Disclosures
• If the fee is passed on: “All retail sales subject to a 1% Santa Cruz Mountains Wine Heritage District fee.”
• If the fee is included in the retail price: “All retail sales include a 1% Santa Cruz Mountains Wine Heritage District fee.”
Clarify on Receipts – Ensure that receipts display the BID fee as a separate line item with clear wording if passed on to the consumer.
By following these steps, your winery can effectively implement a 1% “SCMWHD” fee on all retail sales in California using the OrderPort POS system, ensuring the fee is taxed appropriately and operations remain compliant with state regulations.
Guide to Setting Up the 1% “SCMWHD” Fee in VinNOW
Note: VinNow doesn’t currently have a built-in feature to automatically apply a separate percentage-based fee (like the 1% assessment) to all taxable sales without manual intervention.
This guide walks through configuring VinNOW to apply a 1% SCMWHD fee to qualifying sales. The fee will be charged only on retail (Direct-to-Consumer) transactions and only when the customer’s ship-to or sale location is in California, per Santa Cruz Mountains Wine Heritage District requirements. It will appear as a separate taxable line item on receipts and should be included in both in-person POS sales and online orders. Below are step-by-step instructions for setting this up in VinNOW’s back-office (for the tasting room POS) and the VinNOW Web Cart (online store), along with important notes from VinNOW’s documentation.
In-Person POS Setup (VinNOW Cashier System)
Step 1: Create a New “SCMWHD 1% Fee” Product in VinNOW
1. Open Product Maintenance: In VinNOW Back Office, go to Setup > VinNOW Files > Product Maintenance. Click the “New” button to add a new product vinnow.com. This will open a blank product form where you can enter the fee details.
2. Enter Product Details: Assign a Product ID and Description for the fee. For example, you might use an ID like “SCMWHD” (make sure it’s unique and has no special characters vinnow.com) and a description such as “1% Santa Cruz Mountains Wine Heritage District Fee”. Keep the description clear but short – you can use the “Register Description” field for a shorter label on receipts if needed (to avoid text wrapping on printed receipts) vinnow.com.
3. Set Product Type to Non-Wine: Choose “Non-Wine” as the product Type vinnow.com. This is appropriate for fees or charges (VinNOW treats wine club charges and tasting fees as Non-Wine products as well vinnow.com). This ensures wine-specific fields (like varietal, vintage) are not required.
4. Assign a Category: Select or create a Product Category for this fee (e.g. “Fees” or “Misc Charges”). Every product in VinNOW must belong to a category vinnow.com, though the category is mainly for organization and reporting (it won’t affect the fee’s behavior). You might use an existing “Tasting Fees” category or create a new “Fees” category.
Step 2: Configure the Fee Product’s Tax and Pricing Settings
1. Mark as Taxable: Check the “Taxable” box for the SCMWHD fee product vinnow.com. This ensures that standard sales tax will be calculated on this 1% fee line item, making the fee itself a taxable item (per California rules, since it’s part of the sale). VinNOW will apply the appropriate sales tax based on the order’s ship-to state to any product marked taxable vinnow.com. (Because the fee should only apply on California transactions, and California sales will already trigger CA tax, marking it taxable means the fee will be taxed when it appears on CA sales.)
2. Disable Discounts / Enable Price Override: The fee should not be subject to any discounts (e.g. club member discounts). To enforce this, do not check “Discountable” for this product. Instead, enable “Allow Clerk to Change Price” vinnow.com. VinNOW Note: You cannot have both a discountable product and an overrideable price – it’s one or the other vinnow.com. By allowing price changes and leaving it non-discountable, you prevent any automatic discounts from reducing the fee vinnow.com. VinNOW’s documentation notes that the “Allow Clerk to Change Price” option is intended for open-ended charges like tips vinnow.com, which fits our use-case for an open percentage fee.
3. No Inventory Tracking: Check the option for “No Inventory Tracking” (if available on the product form). This prevents VinNOW from expecting a stock quantity for this item vinnow.com. Since the fee is not a physical product, you don’t want inventory counts or out-of-stock warnings associated with it. (VinNOW specifically recommends enabling “no inventory tracking” for Tasting Fee items to avoid zero-quantity warnings vinnow.com – the same applies here.)
4. Set Retail Price: Decide how you want to calculate the 1% in practice. You have two main options:
- Open Price Method (Recommended): Set the Retail Price to $0.00, and rely on the “Allow Clerk to Change Price” setting to enter the correct fee amount during each sale. If the retail price is zero (no base price), VinNOW will simply use whatever price the cashier enters as the line item price (with no “discount” annotation) vinnow.com. This method is straightforward – the cashier will manually input the 1% amount at checkout (e.g. enter $0.50 on this item for a $50 sale).
- Per-Unit Method: Alternatively, you could set a small base price (e.g. $0.01 per unit) and have staff adjust the quantity of this item to equal the dollar amount of the sale. For example, if a customer’s wine and merchandise total is $50.00, the cashier would add the SCMWHD product and set quantity to “50” (50 × $0.01 = $0.50). However, this approach is more error-prone and less intuitive. Most wineries opt for the open price method above, treating the fee like an openended tip line.
Note: In either case, label the fee clearly so customers know what it is. For example, the receipt line might read “SCMWHD 1% Fee – $0.50”. This makes it obvious it’s a Santa Cruz Mountains Wine Heritage District fee, not an accidental charge or additional tax.
5. Set Wholesale Price to $0: Since this fee must not apply to wholesale customers, configure any wholesale price fields for this product to zero. In Product Maintenance, you’ll see fields like “Wholesale A Price,” “Wholesale B Price,” etc. Enter $0.00 for each wholesale level vinnow.com. This way, if a staff member accidentally added the fee item to a wholesale order (or if a club member with wholesale pricing is processed), VinNOW would apply the wholesale price of $0, effectively excluding the fee for that sale. VinNOW automatically uses a customer’s designated price level (retail vs Wholesale A/B/C) when adding items to an invoice vinnow.com, so having a $0 price on wholesale levels ensures the fee won’t be charged to those customer types.
6. Show on Cashier Screen: Check “Show Product on Cashier Screen” for the fee item vinnow.com. This will list the SCMWHD fee as a button or item in the POS interface, making it easy for cashiers to find and add. (If you prefer not to clutter the menu, you can leave it unchecked and have staff add it by typing the product ID, but having it visible is helpful as a reminder.)
7. Save the Product: Click Add/Save to save this new fee product in VinNOW. The SCMWHD fee is now set up as a product in your system.
Step 3: Implementing the Fee at Checkout (POS Usage)
Once the fee product is created and configured as above, your tasting room staff will need to add it to the appropriate transactions. Here’s how to ensure it’s applied under the right conditions:
• Apply to Retail California Sales Only: Train staff that whenever they ring up a retail sale that will be consumed or shipped within California, they must add the “SCMWHD 1% Fee” line item. In practice, this means:
- Tasting Room/In-Person Sales: Virtually all in-person sales at your Santa Cruz Mountains Wine Heritage District winery qualify (since the sale takes place in CA). Before completing a sale, add the SCMWHD fee product to the ticket and enter 1% of the pre-tax merchandise total as the price. For example, if the customer’s subtotal for wine, merchandise, etc. is $100.00, click the SCMWHDFee item and input $1.00.
- Shipping Orders (Phone/Walk-in orders): If a customer is having their purchase shipped, check the ship-to state on the order. VinNOW will have already determined the tax based on that state vinnow.com. If the ship-to is California, add the 1% fee as above. If the ship-to is outside CA, do not add the fee (the sale is not within CA, so it’s exempt from this fee).
• Do NOT Apply to Wholesale or Exempt Sales: If the order is wholesale (e.g. a restaurant or retailer buying wine at a wholesale rate), or otherwise not subject to CA sales tax, do not add the fee. Using customer types and the pricing setup from Step 2 will generally prevent the fee from being used in wholesale scenarios, but it’s good to be aware. (If you accidentally add it and the customer is wholesale, the fee will ring up as $0.00 due to the wholesale price setting vinnow.com.)
• Verify on Receipt: The SCMWHD fee should print as its own line item on the receipt, with whatever description you entered (e.g. “SCMWHD 1% Fee”) and the dollar amount. It will also have sales tax applied just like any other taxable item – meaning on a printed receipt, it might show up in the taxed subtotal and contribute to the total sales tax line. This matches the requirement that the fee be a taxable line item vinnow.com. Doublecheck a test receipt to ensure the formatting is clear and the fee is correctly labeled.
• Staff Tip: It may help to post a reminder at the register or enable a prompt in your workflow to not forget the fee for CA customers. Since VinNOW doesn’t automatically add the fee line by itself, the onus is on the cashier to include it. Consider enabling the “Daily Business Summary” report to review that all CA sales have the fee. (Tasting fee products, for example, show up in that report vinnow.com – you might categorize this fee similarly for tracking.)
Online Ordering Setup (VinNOW Web Cart)
If you use VinNOW’s integrated web shopping cart for online orders, you’ll need to configure the fee on that platform as well so that online customers with California orders are charged the 1% fee. The general approach is to publish the SCMWHD fee product to your web cart and then make sure it gets applied to the right orders.
Step 1: Enable the Fee Product on the VinNOW Web Cart
1. Web Info for Product: In VinNOW Back Office, open the Product Maintenance screen for the “SCMWHD 1% Fee” product you created. Navigate to the “Web Info” tab for that product (this tab is available if your VinNOW Web Cart integration is active).
2. Show on Web Cart: Check the box labeled “Show this product on web shopping cart” vinnow.com. This flags the fee item so that it will be included in the set of products uploaded to your online store. (VinNOW’s cart only lists items you explicitly mark for web availability.)
3. Web Category: Select an appropriate Web Category for this item vinnow.com. You might create or use a category like “Fees” or assign it to an existing miscellaneous category. If you prefer the fee not to be browsable by customers, you can assign it to a less prominent category – however, it generally will not be something customers actively purchase on their own, so category is not critical except to satisfy the system’s requirement.
4. Web Pricing: Enter the Web Sale Price for this product vinnow.com. Ideally, this should mirror how you set it up for POS: if you left the price open (0.00) in the POS, enter “0.00” as the web price as well. If you used the $0.01-per-unit method, enter $0.01 here. Important: VinNOW documentation advises that the web price should match the in-store price for consistency vinnow.com. (If the web price is lower than the normal price, the cart will treat it as a “sale” price and highlight it vinnow.com – not applicable for our fee, so just keep it the same.)
5. Inventory Settings: Since this fee product has no inventory, you don’t need to set web inventory levels. If VinNOW requires values, you can leave the default or set high values so it’s never marked “out of stock”. Ensure “Inventory Tracking” is unchecked on the web settings as well, if applicable (similar to the POS setup).
6. Save Web Info: Click “Update” (or Save) on the Web Info tab to save these settings for the product vinnow.com.
Step 2: Publish/Synchronize the Fee to the Online Store
1. Upload to Web Cart: Go to Setup > System Options > System Option Settings > Integrated Web Shopping Cart (in VinNOW back office). In the Web Cart settings, use the Initialization/Synchronization options to push product updates to your live cart. Check “Upload all products currently set to show on web” and then click the Update button vinnow.com. This will send the new fee product (and any other marked products) up to the VinNOW web cart.
Note: If you have the web cart already running, you might have an option to “Synchronize Products” under Utilities or a similar menu. Ensure this fee item gets uploaded so it exists on the website. VinNOW confirms that any product marked to show on web will automatically be added to the cart database vinnow.com once uploaded.
2. Verify on Website: After uploading, use the “View Shopping Cart” preview feature or your live website to verify the product appears (if it’s visible) or at least that it’s now part of the cart’s product list. You likely do not want customers manually adding this fee, so it may not be displayed prominently on the storefront. The main purpose of uploading it is to allow the system to charge it when needed. (You can test by attempting to checkout with a CA address, as described below.)
3. Wine Club/Member Sync (if applicable): This step isn’t directly about the fee, but ensure you’ve synchronized any customer data needed (Utilities > Web Shopping Cart > Synchronize customers, etc.) so that the web cart knows who is a club member for discounts. This ensures that club discounts apply to products but not to the fee (since we made the fee non-discountable, the discount shouldn’t affect it on the cart either).
Step 3: Ensuring the Fee is Applied to Online Orders
This part is critical: how do we make sure the 1% fee actually gets added for California online orders? Unlike the POS, the web cart doesn’t have a cashier to manually add the fee, so you need a strategy to include it. As of now, VinNOW’s out-of-the-box web cart does not have an automatic surcharge feature tied to the ship-to state (there is no native setting to “always add X% for CA orders”). Here is a workaround to meet the requirement:
• Manual Addition in Back-Office: With this approach, you allow online orders to come through normally, then manually add the SCMWHD fee in VinNOW before finalizing the order. For instance, when an order is placed on the web cart, it will appear in VinNOW (either as an auto-invoiced sale or in an order queue). For any order shipping to a California address, edit that order in the VinNOW back office: add the “SCMWHD 1% Fee” product line and enter the 1% amount (just as you would in the tasting room), then complete payment capture. This ensures the customer is charged the fee. The downside is it’s not charged at the moment of online checkout – you’d either charge the card for the extra amount after the fact or authorize the order with an adjusted total. If you choose this method, it’s wise to inform customers at checkout (e.g., in the cart’s Warning/Order Completed text) that “A 1% Santa Cruz County Wine Preserve fee will be added for CA orders” so they aren’t surprised. Also, coordinate with your payment processing so that either the initial authorization includes a buffer or you perform a capture for the higher total once the fee is added.
Important: At the time of writing, there is no one-click setting in VinNOW’s Web Cart admin to “add surcharge X for CA.” It will likely require the above solution. Many wineries opt for the manual back-office addition initially, then work with their POS provider for a more automated fix. Be sure to test your chosen method before going live: e.g., place a test web order with a California shipping address and verify that the final invoice in VinNOW includes the 1% fee line correctly.
Consult VinNOW Support if Needed: Implementing a new fee that behaves like a tax is a unique scenario. Don’t hesitate to reach out to VinNOW’s support team for help. They can confirm if newer versions of the software have added a direct feature for the Wine Preserve fee or suggest the best workaround. VinNOW’s documentation and support
Required Disclosure – If the assessment is passed on to customers, it must be disclosed in advance. The disclosure can be placed:
- On a sign or placard in the tasting room
- On tasting room menus, event flyers, and restaurant menus (if applicable)
- In the footer of your website or in the checkout/cart
- On receipts, even if the customer declines the receipt
- In wine club emails
Sample Disclosures
- If the fee is passed on: “All retail sales subject to a 1% Santa Cruz Mountains Wine Heritage District fee.”
- If the fee is included in the retail price: “All retail sales include a 1% Santa Cruz Mountains Wine Heritage District fee.”
Clarify on Receipts – Ensure that receipts display the BID fee as a separate line item with clear wording if passed on to the consumer.
By following these steps, your winery can effectively implement a 1% “SCMWHD” fee on all retail sales in California, ensuring the fee is taxed appropriately and operations remain compliant with state regulations.
We encourage you to contact VinNOW support and request automating this process.
Draft Email to VinNOW Support: help@vinnow.com
Subject: Assistance with Automating the SCMWHD Fee Calculation
Dear VinNOW Support Team,
I am reaching out to inquire about configuring our VinNOW POS system to apply a 1% assessment fee called SCMWHD (Santa Cruz Mountains Wine Heritage District) to all taxable retail sales made in California.
Currently, we are manually adding this fee as a non-inventory product during each transaction. However, we would like to know if there is a way to automate this calculation and application process so the fee is automatically added to all applicable sales (in-person and shipped orders within California).
If no direct automation is available, could you please confirm if there are any workarounds or customization options that could streamline this process? Also, if this feature is something you may be able to implement, we would appreciate any guidance or recommendations.
Thank you in advance for your assistance!
Best Practices for Implementing this Assessment
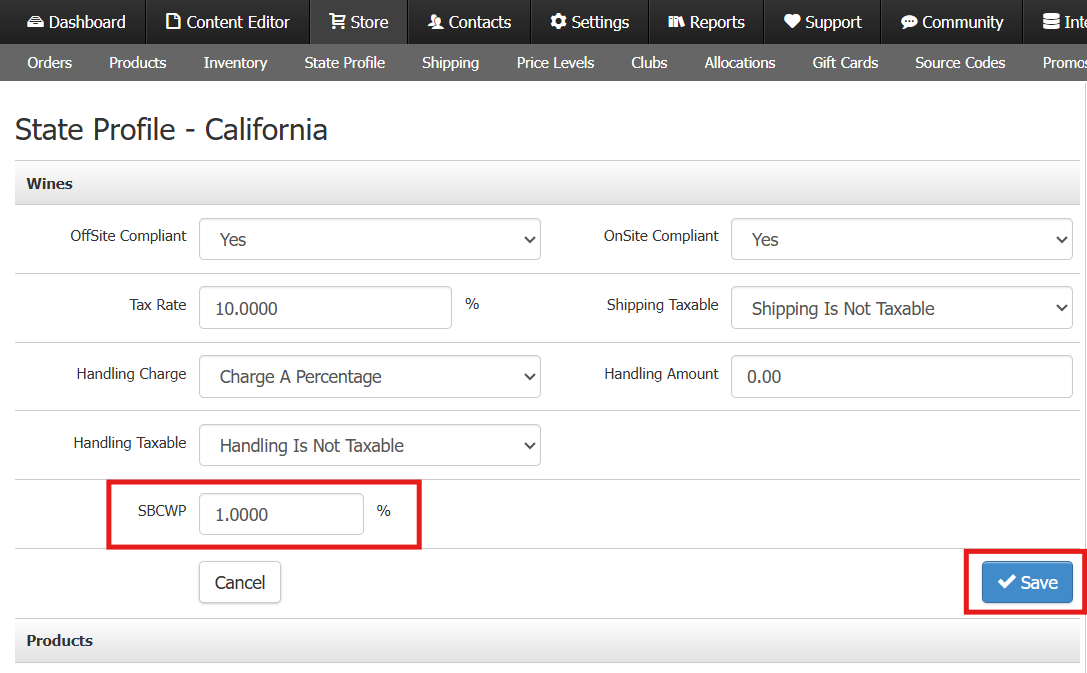
This option applies to the Santa Cruz County Wine Region – Wine Preserve Assessment and collects sales tax on the assessment.Follow the steps below to enable the assessment for your Classic Admin Panel:
- Enable the TVWAHD Checkbox
- Go to Website Settings > Store > State Profile
- Check the box labeled Is TVWAHD?
- Modify the Custom Tax Field
- Once the checkbox is selected, the system will auto-populate “TVWAHD” in the Custom Tax Field
- Replace “TVWAHD” with “SCMWHD”, or whatever you would like to name the fee (14 character maximum).
.png)
- Click on Apply Changes – bottom right corner.
- Set the Tax Percentage
- Navigate to Store > State Profile > California
- Locate the Custom Tax Field under the Wines section and enter the applicable percentage (1%). The tax will apply to all product types EXCEPT Gift Cards and Credits.
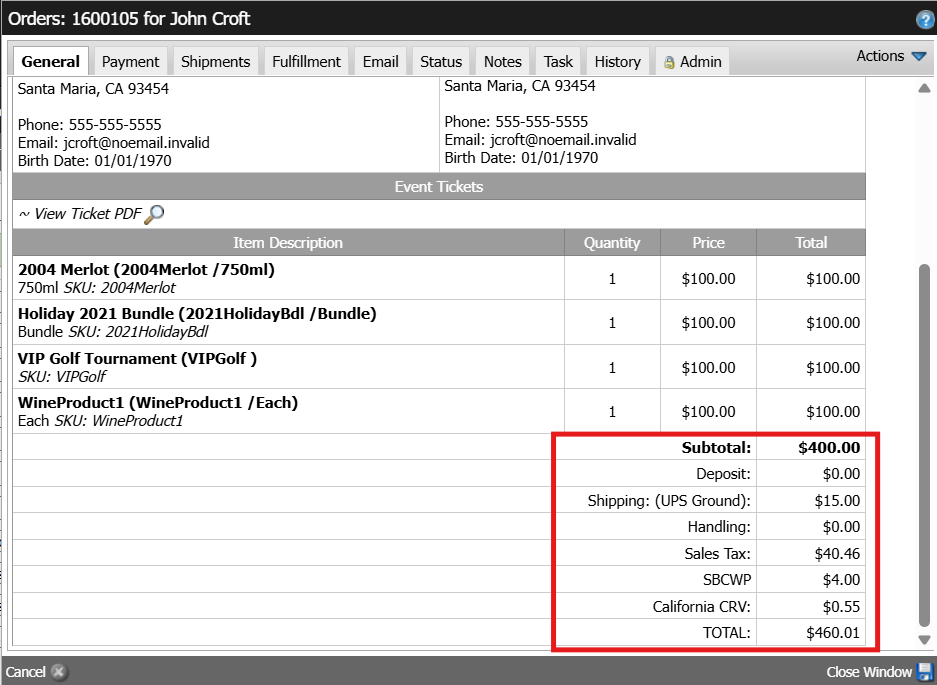
- Result:
- A separate line item for SCMWHD (or whatever you named the fee) will be added to all orders shipped or picked up within California.
- Sales tax will be collected on both the subtotal and the SCMWHD assessment.
- The collected tax will be displayed in the Order Detail Report for reporting purposes.
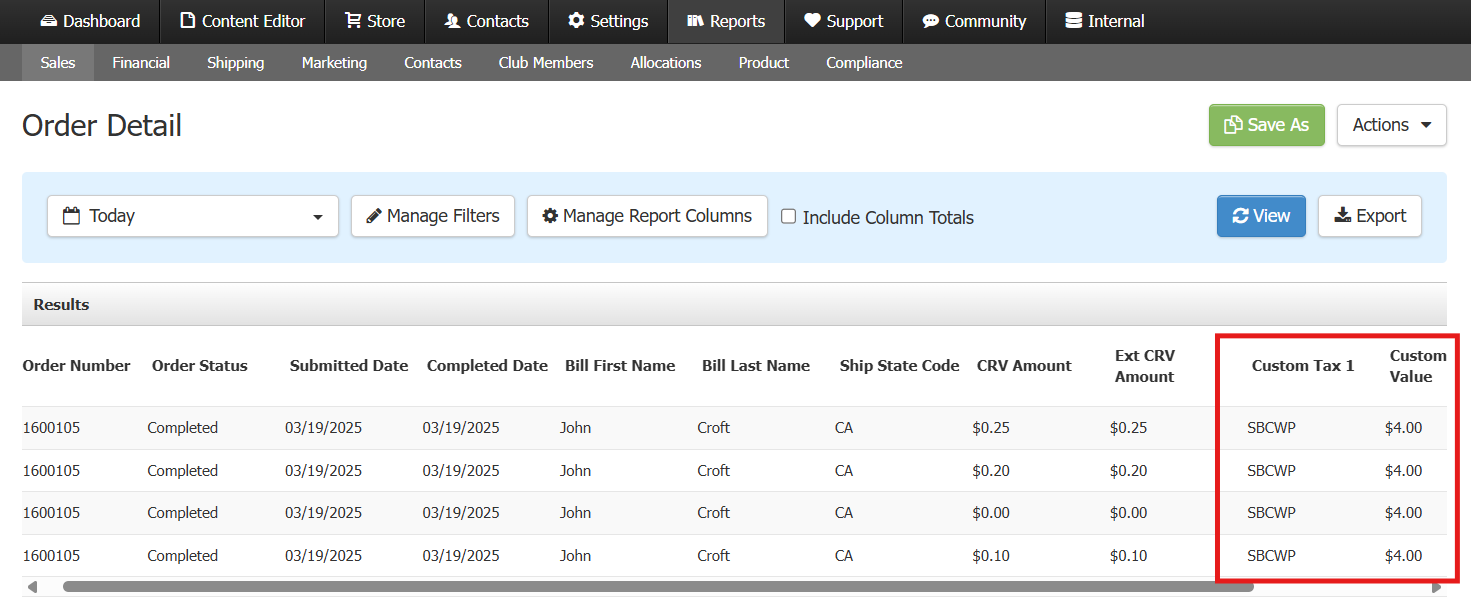
Final Step: Notify Support to Enable Reporting
After completing the setup for the Santa Cruz Mountains Wine Heritage District (SCMWHD) – Assessment, you’ll need to contact the WineDirect support team to ensure the fee information appears correctly in reports.
Why is this necessary?
The system requires a quick update from our development team to display the custom tax fields in the Order Detail Report. Without this step, the tax will be charged to customers but may not show up properly in reporting.
How to Notify Support
Send an email to support@winedirect.com or submit a support ticket through the Admin Panel Support bubble..
- Include the subject line: “Enable Custom Tax Reporting for SCMWHD”
- In the message, mention that you’ve set up a custom tax and need it activated for reporting.
Once the support team completes this update, the SCMWHD tax will be included in your Order Detail Report for tracking and compliance.
Reporting & Compliance
The Order Detail Report will include the custom tax amounts for proper reporting. Ensuring that:
- The collected SCMWHD fees are reported to the necessary regulatory entity
- The correct percentage is applied based on current tax regulations
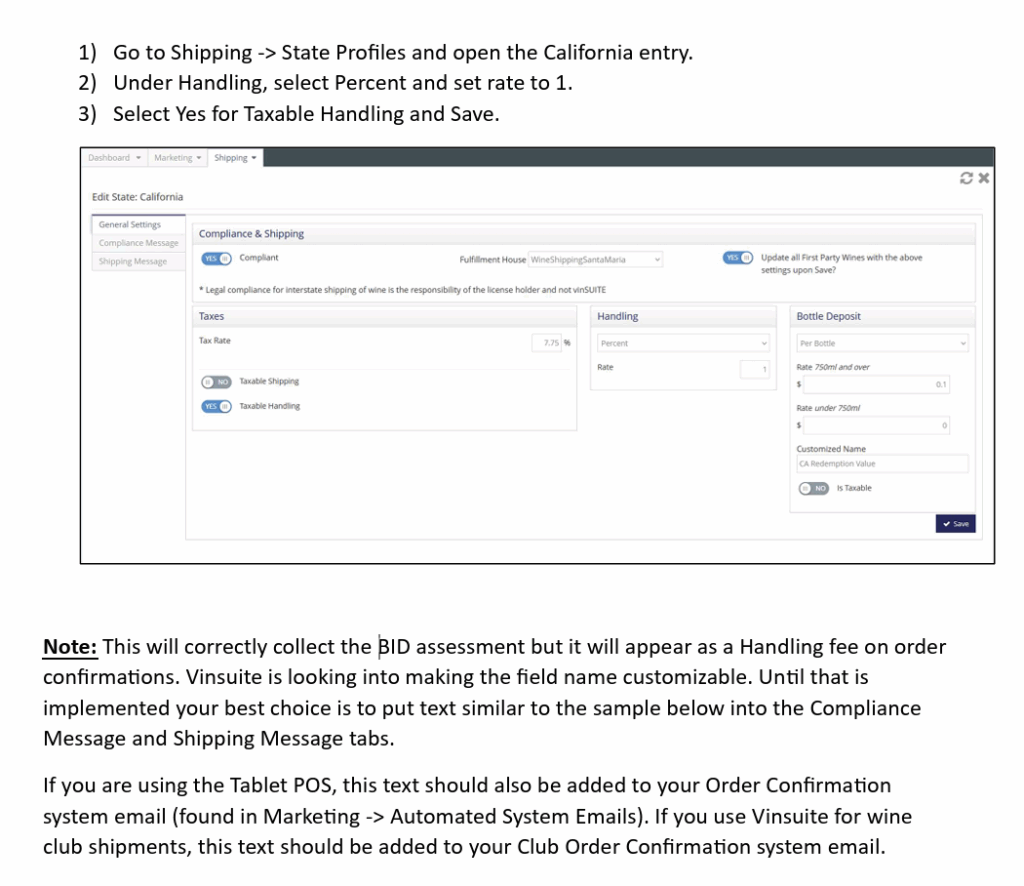
Sample Text: All retail sales subject to a 1% Santa Cruz Mountains Wine Heritage District fee. It will appear on your order as “Handling.” This 1% assessment helps fund marketing efforts for our region.
Custom fees
Custom fees allow you to add flexible fees to orders, narrowing down to specific zip codes, delivery types, products if needed. There are two types of custom fees:
- Custom order fees
These fees will always appear as a separate line item during checkout.
Example: There is a requirement that all orders being shipped from a specific ZIP code has a 2% fee. - Custom shipping fees
These fees will appear as a separate line item on POS orders. They will not appear as a separate line item on web browser orders, it will be built into the shipping line item.
Example: During the summers months, you choose to pack ice packs with any orders going to specific states and charge a $5 fee.
Add a new fee
- Log in to your Vinoshipper account and navigate to Products > Discounts & Fees.
- Click New + and choose which type of fee you would like to add.
- Name the fee and add a description. These items will appear during the checkout process and on the customer’s receipt.
- Select the criteria.
- Choose if the audience is general consumers or wholesale/trade.
- Wholesale fees will be applied to any customers who have been marked as a wholesale account.
- Consumer fees will be applied to all other customers.
- Select one or more criteria that will determine when this fee is applied.
- For custom order fees: Choose order quantity, minimum dollar value, delivery type, effective dates, and/or if it applies to only club members.
- For custom shipping fees: Choose order quantity, minimum dollar value, effective dates, and/or if it applies to only club members.
- Choose the fee type.
- The options are percent per order, dollar per order, or dollar per item.
- If applicable, choose advanced features.
- Fee is Taxable (only applicable for order fees, not shipping fees)
- Specific States: Click + Add State. Check the boxes next to the applicable states, then click Add Selected. The map will show which states this fee will be applied to.
- Specific ZIP Codes: A fee can be applied to specific ZIP codes. You can enter a full ZIP code, or a partial ZIP code that includes the first 3 or 4 digits. If you were to enter 954, all ZIP codes that start with 954 would be included. In this example, that would include most areas of Sonoma, Mendocino, and Lake counties.
- Specific Categories: A discount can be limited to a specific product category or categories. At least one category is required if feature is enabled. If feature is disabled, all categories are included. For example, if you want to offer a discount on all of your merchandise, you can select that category and the discount will automatically apply to that portion of a purchase.
- Specific Products: Click + Add Products, select products from your product list, then click Add Selected.
- Choose if the audience is general consumers or wholesale/trade.
- Once all criteria have been set, click + Create Fee.
- Click Test fee to ensure it applies to orders as expected.
- You will be taken to the Test page.
- Choose which fee you want to test, if it is inactive. If it is active it will automatically apply to the test.
- Enter a ZIP code that the fee will apply to.
- Add products to the test cart.
- Click Test.
- The test results will show you shipping options, the applied discounts and fees, the order details, and where it is shipping to.
- Once you have confirmed it looks correct, click Close. The click Go Back to go to the discounts & fees page.
- If you are ready to use the fee, go to the Custom Fees tab, and click the more menu on the applicable fee line, and click Start.
Fees dashboard
Custom fees list
- To see a list of all your custom fees, go to Products > Discounts & Fees.
- From here, you can filter by state, club, category (order or shipping) or status.
Specific fee dashboard
- To see the fee dashboard, go to Products > Discounts & Fees, and click on the name of the fee.
- Here you will see all the fee details and the Sales History.
- To export the sales history data, click the Download (xls) button in the sales history box.
- Using the Actions button in the top right, you can edit, test, pause, or delete the fee.
coming soon…